Recent Cleaning Posts
Carpet Cleaning your St. Clair Shores Home
12/17/2018 (Permalink)
 Carpet Cleaning in Macomb Township
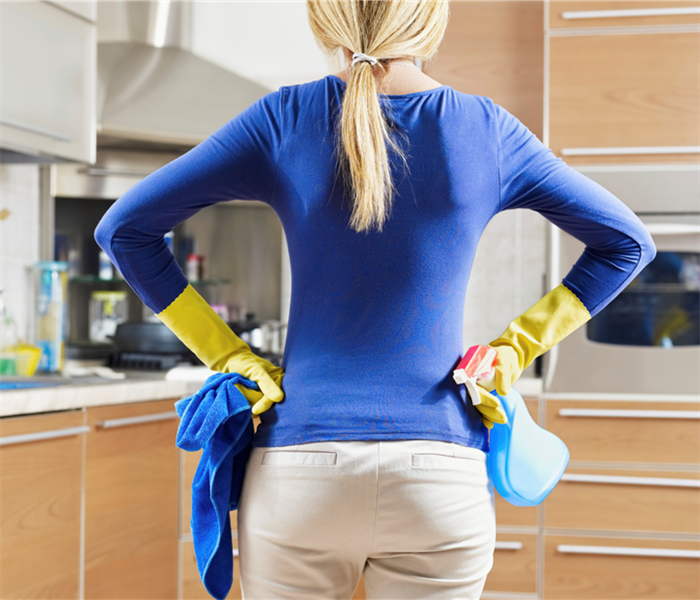
We can Clean Your Carpets
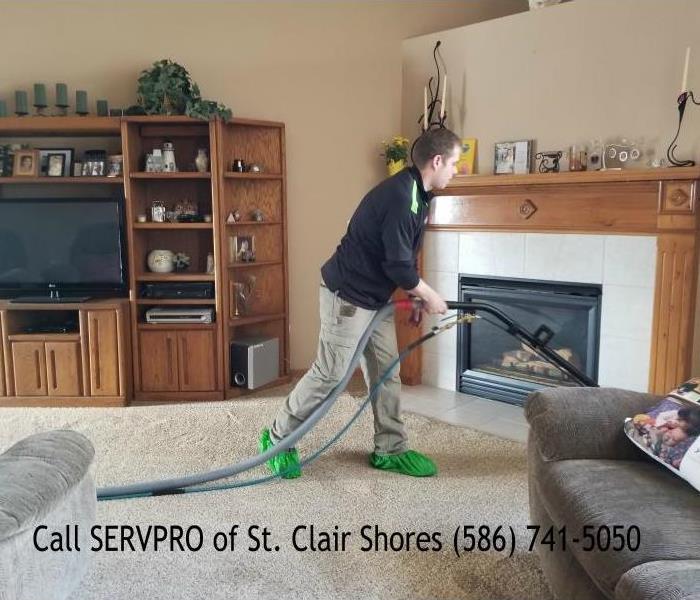
After all of the holiday parties are over, your carpeting probably needs some care. Did you know we also can clean your carpets? If you need help with your deep cleaning chores, give us a call! Our carpet cleaning technicians are ready to help. Vacuuming alone isn’t enough to keep your carpets looking new. A good rule of thumb is to have it professionally cleaned every 12 months. Our technicians use hot water extraction to remove ground in dirt. Most of the moisture is removed with our powerful truck-mounted extraction system, and we take care to use protective pads under all of your furniture to prevent any possible transfer of color. Keep our phone number handy and call SERVPRO OF St. Clair Shores for any cleaning needs (586) 741-5050.
Bad Odor in your Eastpointe Home?
12/17/2018 (Permalink)
 We Can Rid Your Home of Bad Odors
We Are Specialists in Deep-Cleaning
As experts in deodorization, SERVPRO of St. Clair Shores is trained to identify and eliminate offensive odors. These odors can come from a number of sources both inside and outside a structure.
SERVPRO teaches IICRC technical classes in the proper removal of odors. Masking and other short cuts don't work when your odor problem is serious or persistent.
We have the training and equipment to identify and eliminate these offensive odors. By identifying the cause of the odor and determining the conditions in which it contact any surfaces, the odor can often be removed over time without a trace. Our technicians have access to several odor removal products capable of penetrating surfaces to neutralize an unpleasant odor thoroughly.
Call SERVPRO of St. Clair Shores to make an appointment (586)741-5050.
WORRIED ABOUT THE PRESENCE OF AN INFECTIOUS DISEASE?
11/18/2016 (Permalink)
 WORRIED ABOUT THE PRESENCE OF AN INFECTIOUS DISEASE?
WORRIED ABOUT THE PRESENCE OF AN INFECTIOUS DISEASE?
If you’re responsible for a home, office, daycare center, fitness center or the like, safety is always of utmost importance. The key to safety is infectious disease control and preventing infections like MRSA and C. Diff. You can’t afford to try to deal with something as potentially serious as an infectious disease outbreak on your own. We can help. SERVPRO of St Clair Shores will research your particular problem, give you a cleanup and disinfection plan tailored to your situation, and perform the infectious disease control and prevention services. We are well trained and will meet all EPA guidelines for disposal of infectious material.
Call us today to schedule an appointment, SERVPRO of St. Clair Shores (586) 741-5050. We are here when you need us most!
A CLEAN HOME SELLS FASTER!
11/18/2016 (Permalink)
 A CLEAN HOME SELLS FASTER!
Selling a home can be an extremely stressful process. Between staging your home and having to leave every weekend for several hours for open houses, it’s no surprise that people dread selling their homes – even when the market is strong and homes are selling relatively quickly.
Presentation is everything!
SERVPRO of St Clair Shores will inspect a property – including crawl spaces – to help determine the extent of water or mold damage and remove potentially harmful bacteria and odors.
So before you risk your buyer’s health or the opportunity to close the sale of the property, call your local cleanup and professionals at SERVPRO of St Clair Shores (586) 741-5050.
Free Summer Cleaning Checklist
7/6/2016 (Permalink)
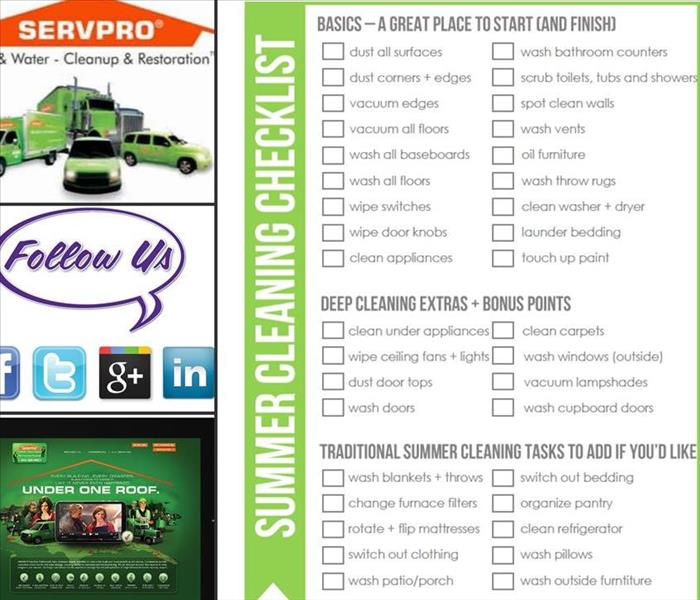 Free Summer Cleaning Checklist!
FREE Summer Cleaning Checklist
by Becky Happy (official) summer! If you want to tackle a little (or a lot of) cleaning during the next few months, this summer cleaning checklist is a reference. Print it out and put it somewhere where you’ll see it and be reminded of your list and you can work on it when it works for you. It’s divided up into 3 sections – do one section or all three – any way you look at it you’re making progress and getting your home ready to welcome summer. Stay tuned for the other Seasonal Cleaning Checklists! Keep us in mind for your floors, we can help with your carpet cleaning and your grout cleaning in your home or business! Also you can ask us about our SERVPRO Cleaning Products that we make at our corporate headquarters in Tennessee. We have everything you could possibly need from Gum Remover to Graffiti Remover to Leather Spotting Kits. Call us today for your cleaning needs at SERVPRO of St. Clair Shores at (586) 741-5050.
Cleaning the Vacuum Filter
6/8/2016 (Permalink)
 Cleaning your Vacuum Filter!
Cleaning A Vacuum Filter
So many more uses for your dishwasher than you can imagine. It’s like a machine! Oh wait, it is a machine. Vacuum filters are extremely pricey (like ink is for a printer), but if you can get that thing clean, there’s no need to replace it. Check out this tip on how to clean your vacuum filters in the dishwasher!
TIP: Clean Vacuum Filters in the Dishwasher
I'll admit it, I'm an obsessive vacuum-er. I hate stepping on little pieces of stuff. Especially with kids - there is ALWAYS stuff on the floor - something is being spilt, knocked over, or deliberately dumped onto the carpet.
So, I vacuum, a lot.
Which means if I don't clean or change my filter regularly the vacuum gets that NASTY smell it throws out when using a dirty filter. Filters are expensive. The filter for my vacuum is $27 (which is 1/5 of the cots of my vacuum! Crazy).
I had heard years ago that you could wash your filter in the dishwasher. I have to say I've been a total skeptic. Which is probably why after owning this vacuum for 7 years, purchasing a number of new filters, and it taking ONE HOUR to vacuum two rooms last week, I finally tried this.
1K+Fed up with this stinky filter, I dumped the dust/trash out and tapped my filter a few times to get the extra dust and allergens out (sick, I know). then I tossed it all in the dishwasher with one of my dishwasher soap pods. Actually, the little mesh divider thing I washed by hand, I didn't want it to rust. Here is how it came out! I was pretty surprised by how clean it got. And, it wasn't until I compared both pictures that I noticed just how clean everything came out.
I put the filter in the window sill to dry for a day or two. Then I ran my dishwasher empty to clean it once or twice - just in case, because I'm paranoid like that.
The filter seems to be working fine. My vacuum doesn't smell and....it finally SUCKS again!
Cleaning a bathtub drain
6/8/2016 (Permalink)
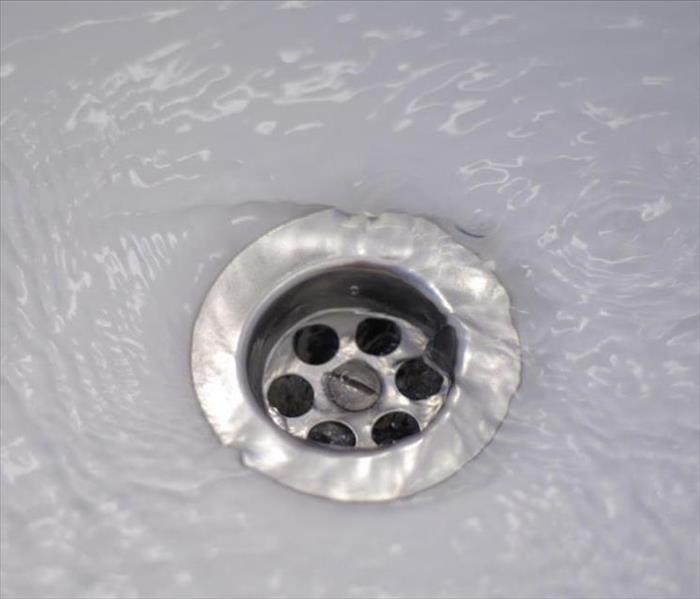 Cleaning a Bathtub Drain
Cleaning A Bathtub Drain
Because I have a lot of hair (A LOT), this is often a problem in my household. I can’t help that my hair is everywhere, and for the most part it doesn’t bother me, but when it gets to the point where it takes 30 minutes to drain the tub, it becomes a problem. But, It’s actually easier than it looks to remove the stopper and get the gunk out.
Tutorial on cleaning a bathtub drain
You’re standing in the shower up to your ankles in water. After your shower or bath the tub takes F-o-r-e-v-e-r to drain or maybe there’s a funky smell in your shower that you just can’t narrow in on, and even after you clean the bathroom your nose says something still isn’t right. Your drain has become slow and you might be thinking you need to pick up a bottle of drain-o or maybe even call in a plumber. But wait! Before you waste any money on this problem, why not give it a shot at fixing the problem yourself- for FREE!! It’s not difficult, although it might be a little gross. Some of you will find great satisfaction in doing this. I kinda do.
Here are the tools you will need to do the job. A screwdriver (depending on your drain you may need a phillips head instead of a flat head), A pair of skinny pliers, some baking soda(mine is from Target, and you’ve never bought your baking soda at Target, you should, the Market Pantry brand is super cheap, like .29 cents), some vinegar, and a few paper towels.
Begin by looking at your drain. Your plug might look different than mine, but they all pretty much are the same in that they unscrew, and then have a screw underneath that you can remove. I start by removing the top part, that says push on it. I simply unscrew it with my hand.
Under that it looked like this.
I put a screwdriver in and removed the insert.
Under that you will generally see a +, you may not be able to see it if there is a lot of hair built up. This + is the reason that hair gets caught up. I am doing my teenage daughter’s drain today and she has really long hair. Long hair means she uses lots of shampoo and conditioner. Using lots of shampoo and conditioner causes a build up of gunk in the drain, along with a bunch of hair washing down together, and it’s no wonder that the water can no longer get down the drain! Now comes the gross part. I’m not going to lie, sometimes the hair, soap, and conditioners smell really bad when you pull them out. They’re starting to rot. Put your paper towels down in the tub along side of the drain, and pick up your pliers. Insert them into the drain and pinch and then pull up. You should come up with a clump of hair. Make a face and put it in the paper towel. Continue doing this until the drain looks clear. I sometimes use a combination of the screwdriver and the pliers if I can’t reach all the hair, and if you don’t have skinny pliers, you may be able to just use your screwdriver, but the pliers are easier.
Here is the grossness that I got today.
Puke right?? The sad part is I did this less than six months ago. It’s not really anyone’s fault and has nothing to do with how clean you are or how often you clean your tub. It just accumulates where no one can see it , and until the drain starts having trouble, you don’t really think about it.
Moving on. . .
The next thing I do is just a great maintenance item. I pour about a half cup of baking soda down the drain, and then pour in vinegar until it bubbles up to the top of the drain. I leave that for about 15 minutes, and then pour really hot water (not quite to boiling) down the drain. This will help disinfect the drain and clean it too. That’s all there is, now reassemble your plug in reverse of what you needed to do to get it apart.
Now turn on your water and watch it go down the drain beautifully. Pat yourself on the back because you just save yourself some money, and by the way, Drain-o won’t clear up this type of problem anyway, it’s not a clog stuck in the drain, it’s stuck on that little + .
I know this is a little gross and if you don’t have the stomach for it, ask your hubby to give it a try before you call someone!
Now the next time your drain runs slow, you will know just what to do. Hope you found this helpful! I appreciate you stopping by.
Have you ever Cleaned your Toothbrush?
6/8/2016 (Permalink)
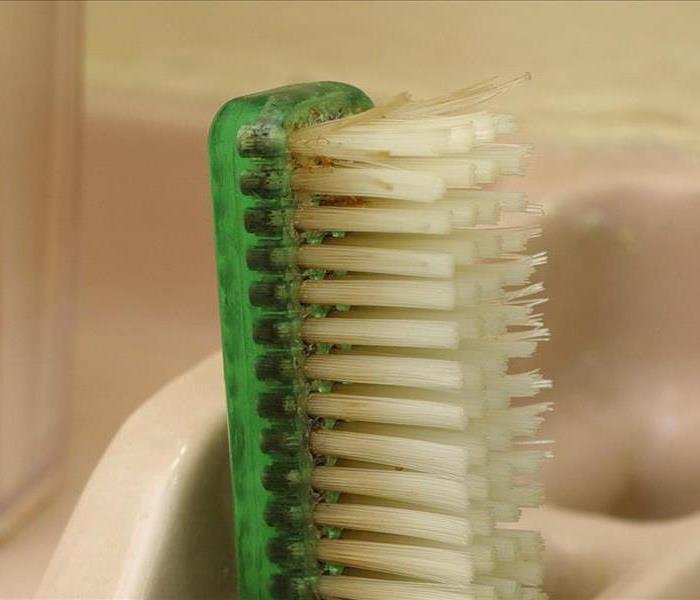 Cleaning your Toothbrush
Cleaning Your Toothbrush
I use to boil my toothbrushes every so often, until one time I got mouth full of loose bristles while brushing my teeth. Boiling kills most of the million of germs that collect on your brush, but also takes its toll on it. There’s an easy solution for that, and it only takes about 15 minutes. Once again, it’s white vinegar!
How to Clean a Toothbrush Naturally
Did you know that toothbrushes harbor hundreds of thousands of bacteria just after one use? That’s not including all of the bacteria your toothbrush picks up from being kept in your bathroom either!
Most of us keep our toothbrushes sitting on the bathroom counter, which is actually the worst place to store them. When the toilet is flushed, unsanitary airborne particles make their way on to your toothbrush.
Why You Should Clean a Toothbrush Naturally
Some recommend dipping the toothbrush in mouthwash to kill the bacteria, but why should we use harmful chemicals when simple natural ingredients are even more effective!
All you need is one ingredient from your kitchen!
Where You Should Store Your Toothbrush
To prevent having your toothbrush gather anymore unnecessary bacteria, just keep your toothbrush stored in another room.
Ever since I was a young kid I always kept my toothbrush on top of my bedroom bureau as I never liked leaving my toothbrush in the bathroom next to everyone else’s. Mostly for the fear of someone accidentally using mine, sure everyone thought I was crazy, but actually, it saved me from being exposed to all of the airborne bacteria!
If you do keep your toothbrush stored in the bathroom, make sure to at least always close the toilet lid when flushing and cover your toothbrush.
How to Clean Your Toothbrush Naturally
What You Need:
-White Vinegar
Or
-Colloidal Silver
-Glass Cup or Jar
How To Do It:
1. Pour several tablespoons of white vinegar into a glass jar and dip your toothbrush in. Let the toothbrush sit in the mixture for at least 15 to 30 minutes.
White vinegar is commonly used as a natural cleaner, it will kill the bacteria and microbes on your toothbrush.
2. Make a mixture of ½ colloidal silver and ½ water. Dip your toothbrush in mixture and let it sit for 15 to 30 minutes.
Colloidal silver has antibacterial, antiviral, and antimicrobial properties and is very effective in removing the harmful bacteria from your toothbrush.
Helpful Cleaning Tricks for everyone's house!
6/8/2016 (Permalink)
 Cleaning Tricks!
We are not only the experts for helping you when disaster strikes, we also like to be the cleaning experts you can bounce ideas off of! See some of the tips and tricks not everyone might know about! As always...when disaster strikes, strike back by calling SERVPRO of St. Clair Shores at (586) 741-5050
* Non-Stick Grill Means Less Mess
This is more of a cleaning prevention rather than a tip, but that’s ok because there’s nothing fun about scraping charred chicken off of a grill. Who knew an onion could be so magical?!To make your grill non-stick all you need to do is cut an onion in half and rub the cut side on the heated grill grate.
* Cleaning Oil Stains On Your Driveway
This has always been my husband’s department (I’m pretty sure I’ve seen him dumping cat litter on the driveway). I guess he didn’t know about Pour-N-Restore, the oil stain remover that starts out as a liquid and dries into a powder! This way it’s easy to apply, and then once it’s dry you can just sweep it up. Very cool.
* DIY Hydrogen Peroxide Spray Bottle
Turn your hydrogen peroxide into a spray bottle! Just replace the bottle cap with a spray bottle head. This stuff is good for cleaning all sorts of things like windows, tubs, and toilets.
* Garbage Disposal Cleaning Trick
You might already know that ice sharpens the blades in your garbage disposal, and that throwing a lemon in there freshens and cleans it up. Why not combine the cleaning solution with the blade sharpener? Genius! Just a couple of ingredients and an ice cube tray, and you’re set. (The best solution is a homemade solution of ice, vinegar, and lemons. Buy an ice tray and write “Garbage Disposal” on the bottom. I don’t think anybody would like to have a vinegar ice cube in their drinking water.
Fill the tray with 8 parts water and 1 part vinegar. Then cut up a lemon and drop a small piece of the lemon rind into each slot to help with odor. Leave the solution to freeze.)
* Cleaning Your Pillows
Did you know that all of that yellowing that happens over time to your pillows is from sweat? I didn’t realize we sweat so much while sleeping. Yuck! Let me be perfectly honest here (don’t judge me), I’ve never washed a pillow before. I just replace them after a year or so. I guess I just assumed you couldn’t put them in the washing machine. Well, I was wrong. You can also make your own Miracle Laundry Whitening Solution. (HOT HOT HOT water
- 1 cup powdered dishwasher detergent
- 1 cup bleach
- 1/2 cup borax)
*Rubber Gloves To Remove Pet Hair
Dampen one of your rubber gloves a little, and then use it to remove pet hair from furniture. The damp rubber material is like a magnet to hair!
*Squeegee Hair Picker Upper
A new use for an old item! Turns out your squeegee has a brilliant use other than getting your windows squeaky clean. Use one as a quick and easy way to wipe pet hair off of your carpets and rugs.
* Use Salt To Clean Your Iron
Salt? Yep! Pour salt on your ironing board (Perhaps cover with a pillow case or something to make clean up easier), and then iron the salt with the steam option off. The dirt on your iron will stick to the salt, making for an easy clean!
*Removing Labels In A Flash
Why must ceramic manufacturers use the stickiest labels they can possibly find? WHY? I recently encountered this problem after I replaced all of my old dinnerware, and then spent 30 minutes trying (trying!) to remove the labels. Next time, I’ll remove them the easy way with Oxi-Clean! Wish I had know this years ago.
*Clean Fan Blades With A Pillow Case
If you’re anything like me, you have about a dozen extra pillow cases laying around in a spare closet. Wait, is that just me? Use one to slide onto the blades of your ceiling fans, and then wipe the blades off inside the case. No more dust in your face! So quick and easy, too.


 24/7 Emergency Service